The difference between a golf simulator room that gets used five nights a week and one that gathers dust isn’t the launch monitor or the projector. It’s the room design. A space that feels intentional, comfortable, and finished invites you to walk in and swing. A space that feels temporary, cluttered, or unfinished creates friction that kills the habit before it starts.
I’ve designed and fitted sim rooms ranging from $4,000 garage builds to $50,000 dedicated entertainment spaces. The pattern is consistent: the rooms that get used look like someone planned them, not like someone crammed equipment into a spare corner. This guide covers seven real design concepts that work in homes, with practical details on dimensions, components, finishes, and the trade-offs each approach involves.
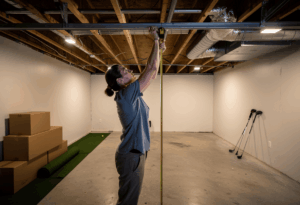
Before you design, measure: Every room concept below assumes minimum 10W x 15D x 9H feet for a full driver build, or 10W x 12D x 8.5H feet for an iron-only build. Ceiling height is the kill switch. Measure to the lowest obstruction in the swing zone before any design planning begins.
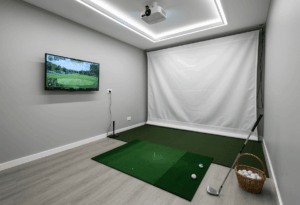
1. The clean practice studio
This is the minimalist approach: nothing in the room that doesn’t serve the practice. Neutral walls (matte dark gray or charcoal work best for projector contrast), wall-to-wall nylon turf, a clean enclosure or built-in screen, and zero decorative distractions. The aesthetic is closer to a PGA Tour fitting bay than a man cave.
What makes it work: dimmable track lighting on the ceiling split into two zones – bright LEDs behind the hitting position for the golfer’s visibility, and dark near the screen wall for projector image quality. A simple dimmer switch or smart bulb setup handles this for $50-$150. Clean cable management is essential – HDMI and power inside wall conduit, no visible wires anywhere.
The practice studio appeals to serious low-handicap players who want data, not entertainment. Add a wall-mounted secondary monitor showing live launch data beside the main screen and the room becomes a genuine training facility. The Uneekor EYE XO2 and Foresight GC3 both support dual-display configurations that show data on one screen and course visuals on another.
Budget range: $5,000-$12,000 depending on launch monitor tier. The room finishes (paint, turf, lighting, cable routing) add $800-$2,000 to whatever you spend on sim equipment.
2. The entertainment lounge
The most popular design concept I see in client builds – and for good reason. A lounge-style room combines the simulator with seating, a bar area, and a TV for a space that hosts game nights, friends-over rounds, and movie screenings when the clubs are put away.
The layout that works best: hitting zone on one end, lounge seating behind the golfer, bar or drink station on the side wall. The key dimension is depth – you need at least 18-20 feet to fit a comfortable tee-to-screen distance plus a seating area behind the golfer that’s out of the swing zone. Wider rooms (14-16 feet) allow a bar counter along one side without crowding the hitting area.
The dual-purpose projector is the entertainment lounge’s best trick. Mount a retractable impact screen in front of the main wall. When the screen goes up, the same projector serves movie night, game day, or party mode. Carl’s Place and SIG both sell retractable screen systems that roll up in under a minute, converting the sim bay back into a theater or lounge space.
Design touches that separate good from great: a brass or matte-black foot rail along the bar counter, floating shelves for golf memorabilia, smart home integration for voice-controlled lighting scenes (“game mode” dims the screen wall while keeping the bar lit), and a mini-fridge built into the bar. The best entertainment lounges feel like the owner’s favorite room in the house, not like a sim with a couch bolted on.
Budget range: $10,000-$25,000 including sim equipment, bar build-out, seating, and finishes. The room construction and finishes often cost as much as the simulator itself.
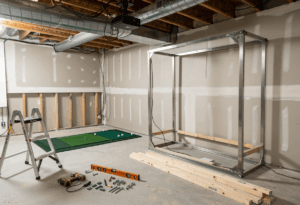
3. The garage conversion
The most common build type in the real world, and the one that benefits most from intentional design over default-garage aesthetics. A dedicated garage bay with insulated walls, finished ceiling, turf flooring, side-mounted garage door opener, and proper lighting stops looking like “a simulator in the garage” and starts looking like a purpose-built golf room.
The design decisions that matter most: flooring transforms the space. Bare concrete reads as “garage.” Interlocking foam tiles ($200-$500) read as “functional.” Full nylon turf wall-to-wall ($800-$2,000) reads as “dedicated golf room.” The perception difference drives usage patterns – finished rooms get used more than unfinished ones.
Wall treatment is the second biggest visual upgrade. Padded acoustic panels on the screen-side wall serve double duty: they absorb the impact noise that carries through shared walls and they look professional. Dark-colored panels ($150-$400) frame the enclosure and create a theater-like feel that makes the projected image pop. Add a simple LED strip along the base of the side walls for ambient lighting and the garage conversion looks like it cost twice what it did.
For dual-use garages where the car still parks, retractable screen systems like the SIG G-TRAK are the design-forward solution. The screen rolls down from the ceiling tracks, side netting extends, and the sim is ready in under a minute. When the round is over, everything retracts and the car drives back in. Clean, intentional, no compromise feel.
Budget range: $6,000-$15,000 for the sim, $1,500-$5,000 for garage finishing (insulation, flooring, wall treatment, lighting, climate control).
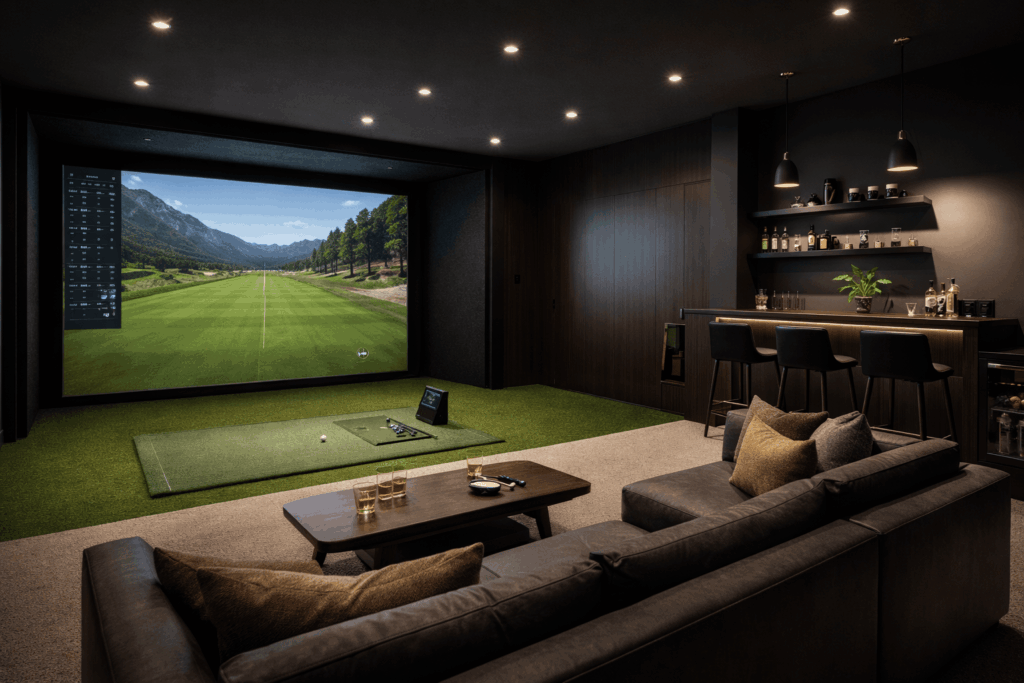
4. The basement theater-sim combo
This is the design concept that gets the most excitement from clients and their families, because it solves the “sim room that only one person uses” problem. By day it’s a golf simulator. By night it’s a home theater. The same room, same projector, same screen, two completely different experiences.
The key element is a retractable impact screen mounted in front of a dedicated theater wall. When the screen is down, it’s a sim. When it rolls up, the wall behind becomes a standard projection surface for movies and TV. Some builders install a permanent impact screen and project onto it for both uses, which simplifies the setup but sacrifices some image quality for movie viewing.
Theater-sim combos work best in basements because of the natural darkness and sound isolation. The basement’s biggest asset – no ambient light – is exactly what both a projector-based sim and a home theater need. Add blackout treatment on any egress windows, surround sound speakers, and reclining seating behind the hitting zone, and the room serves both purposes at a genuine quality level.
The acoustic treatment does triple duty in this design: it absorbs ball-impact noise, improves theater audio quality, and prevents sound transfer to upstairs rooms. Panels on the screen wall and ceiling insulation above the hitting zone handle all three for $300-$700.
Budget range: $10,000-$20,000 for the sim and theater combined, assuming the basement is already finished. Unfinished basements add $5,000-$15,000 in construction costs.
5. The dedicated shed or outbuilding
This is the dream build for golfers who want total control over dimensions, insulation, layout, and noise without compromising any room inside the house. A purpose-built shed or outbuilding means you spec the ceiling at 10-11 feet, the depth at 20 feet, and the width at 14-16 feet from the start. No soffits, no beams, no negotiating with the family about the guest room.
Minimum shed size for a functional sim: 12 x 20 feet (240 sq ft). This gives you depth for the hitting zone and screen but not much else. The ideal shed is 14 x 24 feet (336 sq ft) or larger, which adds room for a small seating area, club storage, and comfortable swing clearance on all sides. A 16 x 30 foot structure adds bar seating and multi-purpose potential.
Design considerations specific to outbuildings: insulation is non-negotiable in any climate, both for temperature stability and to protect electronics. A mini-split HVAC unit ($2,000-$3,500 installed) handles heating and cooling. Run dedicated electrical before finishing the walls – a 20-amp circuit for the projector and PC, plus outlets for accessories. Plumb a water line if you’re adding a bar sink.
The aesthetic advantage of a shed build is that every surface is designed around the sim. Dark walls behind the screen, nylon turf floor, recessed lighting, built-in club rack, mounted scorecard display from your best GSPro rounds. It becomes a personal golf clubhouse 20 steps from the back door.
Budget range: $15,000-$40,000+ including structure, insulation, HVAC, electrical, sim equipment, and finishes. The structure itself typically runs $8,000-$20,000 depending on size and quality.
6. The family game zone
This design puts the golf simulator as one attraction in a larger entertainment space, not the sole purpose of the room. Pair it with a pool table, shuffleboard, arcade machine, putting green, or gaming station and the room becomes the family’s go-to hangout, not just “dad’s golf thing.”
The layout works in large basements (20+ feet wide) where you can zone the space: golf bay on one end, game area in the middle, seating and bar on the far end. The zones need enough separation that a golfer swinging doesn’t create anxiety for someone playing pool 12 feet behind them. Use physical dividers – a half-wall, a row of bar-height stools, or heavy curtains – to create that psychological separation.
GSPro and E6 Connect both include multiplayer modes, closest-to-the-pin games, and casual-friendly formats that keep non-golfers engaged. The Sim Golf Tour tournaments in GSPro add competitive structure for the serious golfers in the household, while the mini-games keep kids and casual players entertained. The simulator software is what makes this concept work for everyone, not just the golfer who bought it.
Budget range: $12,000-$30,000 for the combined space. The sim itself runs $5,000-$12,000 and the additional game elements, seating, and finishes account for the rest.
7. The spare-room stealth build
Not every golfer has a basement, garage, or the budget for an outbuilding. The stealth build turns a spare bedroom, bonus room, or home office into a functional sim that folds away when not in use, keeping the room multi-purpose.
The core of this concept: a quality net that folds flat against the wall, a portable hitting mat, a compact launch monitor, and a TV mounted on the wall. No projector, no permanent enclosure, no turf flooring. Setup takes 5 minutes, teardown takes 5 minutes, and the room returns to its normal function immediately.
The design challenge is making it look intentional even when stowed. A wall-mounted club rack, a small cabinet for the launch monitor and accessories, and a designated corner for the rolled-up mat keep everything organized. When the sim is set up, the TV shows GSPro courses. When it’s put away, the TV shows whatever the room was designed for.
This concept works in rooms as small as 10 x 12 feet with 9-foot ceilings. The SkyTrak+ on a floor stand, a 55-inch TV on the wall, and a compact net with side curtains give you full iron practice and limited driver swings in a space most people would say is too small for a sim.
Budget range: $2,500-$5,000. This is the entry point that lets you test whether you’ll actually use a simulator before investing in a dedicated room.
The design detail that has the single biggest impact on how a room feels is not the enclosure or the lighting. It’s the flooring. Every room where I’ve installed full nylon turf wall-to-wall gets described by the owner as “my golf room.” Every room with bare concrete or unfinished floors gets described as “the garage with a sim in it.” The language difference predicts usage. Finished floors mean finished rooms, and finished rooms get used.
Design principles that apply to every concept
Regardless of which room concept you choose, a few principles consistently separate the builds that get used from the ones that don’t.
Lighting zones matter more than lighting fixtures. Split the room into at least two zones: bright behind the golfer (for visibility and comfort), dark near the screen (for projector contrast). A single overhead light that illuminates the whole room equally washes out the projected image and makes the space feel flat. Dimmable LEDs, track lighting, or smart bulbs give you separate control for $50-$200.
Sound treatment is a design element, not an afterthought. Dark acoustic panels on the screen wall frame the enclosure, absorb impact noise, and create a theater-like depth that makes the room feel larger. They’re functional and aesthetic simultaneously. Budget: $150-$400 for a standard sim bay.
Cable management is the invisible upgrade. Visible cables across the floor and hanging from the ceiling make any room feel temporary. Wall-mounted conduit, cable raceways, or in-wall routing for HDMI and power runs take 2-3 hours during the build and permanently upgrade the room’s feel. Use white or matching paint on any exposed conduit to blend it with the wall.
Club storage belongs on the wall, not on the floor. A wall-mounted club rack or pegboard system ($30-$150) keeps clubs accessible, displays them as part of the room’s design, and eliminates the golf-bag-in-the-corner look that signals “temporary setup.” Floating shelves above the rack hold accessories, balls, and any golf memorabilia.
Temperature control determines year-round usage. A room that’s 95°F in summer or 40°F in winter doesn’t get used in those months, regardless of how good it looks. Insulation plus a mini-split HVAC ($2,000-$3,500) for garages and sheds, or simply running the home’s existing HVAC into a basement room, turns a seasonal sim into a 12-month one.
Frequently asked questions
What is the best room for a golf simulator?
A finished basement with 10-foot ceilings is the best location for most golfers: climate-stable, naturally dark for projection, sound-isolated from the rest of the house, and typically deep enough for any launch monitor. Garages are second-best if ceiling height clears 9 feet. Dedicated outbuildings are best-in-class if budget allows new construction.
Can a golf simulator room double as a home theater?
Yes – this is one of the most popular design concepts. A retractable impact screen in front of a theater wall serves double duty. The same projector handles both golf and movies. Basements with natural darkness are ideal for this combo because both uses benefit from controlled light.
How much does it cost to finish a golf simulator room?
Room finishes (flooring, wall treatment, lighting, acoustic panels, cable management) typically add $1,500-$5,000 on top of the sim equipment cost. Full nylon turf runs $800-$2,000. Acoustic panels run $150-$400. Track lighting with dimmers runs $100-$300. Paint is the cheapest and highest-impact finish at $50-$200.
What color should I paint a golf simulator room?
Dark matte colors (charcoal, dark gray, deep navy) on the screen-side wall produce the best projector contrast. The remaining walls can be lighter for a balanced feel. Avoid gloss finishes near the screen – they reflect projector light and create hotspots. Matte or eggshell finishes absorb light properly.
How do I reduce noise from a golf simulator?
Three layers solve 90% of sim noise. Acoustic panels on the screen-side wall ($150-$400) absorb the impact thump at the source. Mineral wool insulation between ceiling joists above the hitting zone ($100-$300) reduces upward sound transfer. A foam underlayment beneath the hitting mat ($50-$150) decouples vibration from the floor structure.
In summary: design drives usage
The golf simulator room design you choose determines whether the sim becomes the most-used room in the house or an expensive storage closet. The equipment matters, but the environment matters more. A $6,000 build in a finished, intentional room gets used 5x more than a $15,000 build in an unfinished space with bare walls, visible cables, and concrete floors.
One design trend I’m seeing more of in 2026 that I think will become standard: a secondary data monitor mounted beside or above the main screen. Launch monitors like the Uneekor EYE XO2, Foresight GC3, and even the SkyTrak+ support dual-display output, and having your shot data visible at a glance while the main screen shows course play transforms the practice experience. It’s a $300-$500 addition (a spare gaming monitor on a wall mount) that makes every session more productive.
Start with the room, not the equipment. Measure, plan the layout, choose the concept, select finishes, then buy the sim components that fit the space. The builders who do it in that order end up with rooms they love. The builders who buy the launch monitor first and “figure out the room later” end up with equipment in search of a home.
The single best design investment I’ve seen clients make isn’t a $4,000 laser projector or a $10,000 launch monitor. It’s $1,500 in room finishes: turf floor, dark paint on the screen wall, dimmable lighting, and a wall-mounted club rack. Those finishes turn “the garage sim” into “my golf room” – and that shift in how the owner talks about the space predicts everything about how much they’ll actually use it.