Projector setup is the single biggest factor in golf simulator image quality – more important than resolution and more important than lumens. A $700 projector in the right position looks better than a $3,000 projector mounted in the wrong spot. The difference between a sim that impresses and a sim that frustrates comes down to three numbers: throw ratio, mounting distance, and ceiling height relative to the screen.
I’ve calibrated projectors in dozens of builds, and the same two mistakes show up constantly: buying a projector without checking the throw ratio against the room dimensions, and mounting it where it casts a shadow on the screen during every swing. Both are preventable with 15 minutes of math before any equipment gets ordered. This guide walks the setup from calculation through calibration, so the projector works the first time.
Before you start: You need three measurements – screen width, distance from screen to planned projector position, and ceiling height. The formula: Throw Distance = Screen Width x Throw Ratio. For a 10-foot screen with a 0.8 throw ratio projector, you need 8 feet between the lens and the screen. Short throw (0.5-0.89) is standard for golf sims. Standard throw (1.0+) rarely works in residential rooms.
Step 1: Understand throw ratio (this determines everything)
Throw ratio is the relationship between the projector’s distance from the screen and the width of the projected image. It’s the most important specification in your entire projector purchase, and it’s the one most buyers skip over.
The formula is simple: Throw Ratio = Distance from Projector Lens to Screen / Screen Width. A throw ratio of 0.8 means the projector sits at 80% of the screen’s width away from it. For a 10-foot-wide screen, that’s 8 feet. For a 12-foot screen, that’s 9.6 feet. Lower throw ratio means the projector sits closer to the screen. Higher ratio means farther away.
For golf simulators, short throw (0.5 to 0.89) is the standard. This range lets you mount the projector behind the golfer, above the hitting zone, close enough to the screen to avoid shadow issues while filling the entire screen surface. Ultra-short throw (under 0.5) sits extremely close to the screen – typically 4-5.5 feet for a 10-foot screen – and is used for floor-mounted setups where the projector lives inside the enclosure. Standard throw (1.0 and above) needs 10-15 feet of distance, which puts the projector so far behind the golfer that shadow issues become unavoidable in most residential rooms.
Many short throw projectors have a zoom lens with a variable throw ratio (for example, 0.69-0.83). This gives you a window of acceptable mounting distances rather than a single fixed point, which is enormously helpful during installation. The BenQ TK710STi at 0.69-0.83 fills a 10-foot screen from anywhere between 6.9 and 8.3 feet – that flexibility lets you fine-tune position after mounting rather than drilling holes in precisely the right spot on the first try.
Step 2: Calculate your mounting position
With your screen width measured and your projector’s throw ratio identified, the math is straightforward. Multiply the screen width by the throw ratio to get the required distance from the lens to the screen surface.
Example: a BenQ TK710STi (throw ratio 0.69-0.83) projecting onto a 10-foot-wide SIG10 impact screen needs the lens between 6.9 and 8.3 feet from the screen surface. Since the tee position is typically 8-10 feet behind the screen, and you want the projector roughly 2-4 feet behind the tee position, a mounting distance of 7-8 feet from the screen puts the projector right above or just behind where you swing. This is the ideal ceiling-mount zone for most builds.
For a BenQ LK936ST (throw ratio 0.81-0.89) on a 12-foot-wide SIG12 screen, the lens sits between 9.7 and 10.7 feet from the screen. That puts it further behind the golfer, which is fine in deeper rooms but can create shadow issues if the golfer is positioned less than 8 feet from the screen.
Always measure from the lens, not the back of the projector. The lens sits at the front of the housing, and depending on the projector model, the back of the unit extends 8-14 inches behind the lens. A projector that needs 8 feet of throw distance needs 8 feet from the lens to the screen, plus whatever space the housing occupies behind the lens, plus clearance from the ceiling or wall behind it.
Use the manufacturer’s calculator: BenQ’s Golf Sim Planner tool lets you input room dimensions, screen size, and launch monitor type, then generates a 3D view showing exactly where to mount and whether shadows will be an issue. Use it before drilling anything. Optoma and Epson have similar calculators on their sites.
Step 3: Choose your mounting method
Ceiling mount (most common, recommended for most builds)
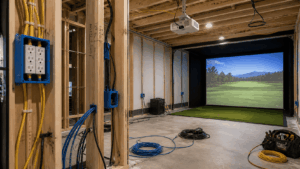
This is the standard for 90% of home golf simulator builds and for good reason. The projector hangs from the ceiling above and behind the hitting position, completely out of the swing path and ball flight zone. The centered overhead position minimizes the need for keystone correction, and the clean look matches what you’d see in a commercial sim bay.
The projector mount itself needs to hit a structural joist, not just drywall. Use a stud finder to locate joists, and use lag bolts rather than drywall anchors for any mount supporting a projector (typically 5-15 pounds). Universal ceiling mounts from brands like Chief and Peerless run $30-$80 and fit most short-throw projectors. Some projectors (like the BenQ TK710STi) come with their own mount brackets.
Height matters. The projector lens should sit roughly level with the top edge of the screen, or slightly above. If it’s too high, the image angles downward and requires keystone correction, which degrades image sharpness. If it’s too low, it projects upward into the screen and creates geometric distortion. In a 9-foot ceiling room with a screen top at 8 feet, mounting the projector at 8-8.5 feet keeps the lens roughly aligned with the screen top.
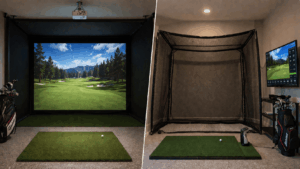
Floor mount (for tight or high ceilings)
Floor mounting puts the projector inside a protective enclosure on the floor in front of the hitting area, pointing upward at the screen. This requires an ultra-short throw projector (throw ratio under 0.5) and a floor-mount enclosure that protects the projector from errant golf balls. The Optoma GT2400HDR ($1,299) with its 0.496 throw ratio is designed for exactly this placement.
Floor mounting works best when the ceiling is too high for a ceiling mount (12+ feet), when the ceiling structure won’t support a mount (open trusses, exposed beams), or when the setup needs to be portable. The trade-off: the projector is in the ball flight zone and needs physical protection. Enclosure cages run $100-$300 and are non-negotiable for this setup.
Cart or tripod mount (temporary setups)
For retractable or dual-use builds where the simulator comes down between sessions, a projector cart or tripod lets you position the projector and roll it away when done. This works but introduces recalibration on every setup. Mark the cart’s position on the floor with tape to speed up re-alignment.
Step 4: Eliminate shadows
Shadow on the screen is the most common post-installation complaint and the most preventable. When the projector is between the golfer and the screen, the golfer’s body blocks the light path and casts a shadow across the projected image. The solution is positioning – not brightness.
The rule: mount the projector close enough to the screen that the golfer’s body is behind the light cone, not inside it. With a short throw projector at 7-8 feet from a 10-foot screen, and the golfer standing 8-10 feet from the screen, the light cone passes above the golfer’s head from the ceiling-mounted position. The golfer is behind the projector’s beam, not in front of it.
If your room is tight and the golfer stands closer to the screen (6-7 feet), shadows become more likely even with short throw. In this scenario, ultra-short throw floor-mounted setups eliminate the shadow problem entirely because the projector sits below the hitting area and projects upward from near the screen surface.
Test before you permanently mount: temporarily tape or clamp the projector in the planned position, turn it on, and take a full swing. If any part of your body or club casts a visible shadow on the screen during the swing, adjust the position before drilling mounting holes.
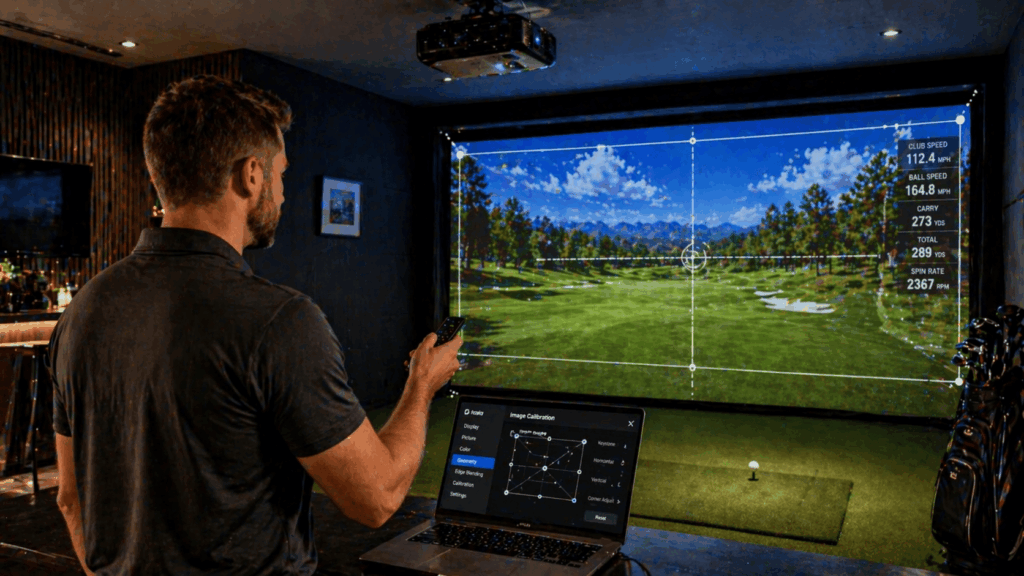
Step 5: Align and calibrate the image
With the projector mounted, the image needs to be squared to the screen and focused. This is the step most builders rush, and it shows.
Keystone correction fixes trapezoidal distortion when the projector isn’t perfectly perpendicular to the screen. Most modern projectors offer both vertical and horizontal keystone adjustment. Use it sparingly – heavy keystone correction degrades image sharpness because it’s a digital manipulation that discards pixels. If you need more than 15 degrees of keystone, reposition the projector rather than correcting digitally.
Lens shift is the premium alternative. Available on higher-end projectors, lens shift physically moves the lens inside the housing to adjust the image position without any digital manipulation. If your projector has lens shift (the BenQ LK936ST has both vertical and horizontal), use lens shift first and keystone only for fine-tuning. The image quality difference is visible on large screens.
Focus is straightforward but critical. Project a test pattern (most projectors have a built-in one) and adjust the focus ring until text and grid lines are sharp edge-to-edge. On curved or wrinkled impact screens, you may not achieve perfect edge-to-edge focus – prioritize the center of the screen where ball flight data and course visuals display.
Aspect ratio matters more than most builders realize. Most simulator software outputs at 16:9 (widescreen). Most impact screens are closer to 4:3. If you project a 16:9 image onto a 4:3 screen without adjusting, you get black bars at the top and bottom, wasting screen real estate. Some projectors allow aspect ratio adjustment to fill the screen, or you can adjust the software’s output resolution to match your screen’s proportions.
The calibration step that saves the most time in every build: project a full-white test screen and photograph the result with your phone. The phone camera reveals hotspots, uneven brightness, and color shifts that your eyes adapt to and miss. If one corner is noticeably dimmer than the center, the projector isn’t square to the screen. Fix the alignment before fine-tuning anything else.
Step 6: Control ambient light
A projector’s rated lumens assume complete darkness. Your room probably isn’t completely dark. Every light source that hits the screen washes out the projected image, and no amount of brightness compensates for a room that leaks daylight onto the screen surface.
For garages: blackout the door gap ($30-$60 strip), cover windows with blackout curtains ($100-$300), and turn off or dim overhead lights near the screen wall. A $700 projector in a blacked-out garage looks better than a $3,000 projector in a garage with daylight leaking through the door gap.
For basements: you already have the advantage. Natural darkness is the basement’s biggest projector asset. Cover any egress windows with blackout treatment, and install dimmable lighting split into two zones – bright behind the golfer (for visibility), dark near the screen (for image quality). A $50 smart dimmer handles this.
For minimum brightness by room type: fully dark rooms need 2,500-3,000 lumens. Controlled-light rooms (blacked out but with some ambient) need 3,000-4,000 lumens. Mixed-light rooms (garages with persistent ambient) need 4,000-5,100 lumens. The BenQ TH671ST at 3,000 lumens works great in basements. The BenQ LK936ST at 5,100 lumens handles any room including garages with ambient light.
Step 7: Run the cable right (the $30 fix nobody does)
The projector connects to your gaming PC via HDMI. The distance between the PC (typically on the floor near the hitting area or on a shelf) and the projector (on the ceiling 10-20 feet away) creates a cable length challenge that most builders underestimate.
Standard passive HDMI cables degrade signal quality past 15 feet at 4K resolution. The image flickers, drops to lower resolution randomly, or shows artifacts. Builders blame the projector when the cable is almost always the problem. Budget $30-$60 for an active HDMI cable or fiber optic HDMI cable rated for 4K at the length you need. This is the cheapest component in the build and the one that causes the most troubleshooting.
Route the cable inside ceiling conduit or wall channels during the frame build, not after. Clean cable management transforms the room’s feel from temporary to permanent, and it protects the cable from physical damage during setup and teardown of the hitting area. Label both ends of the cable with painter’s tape so you can identify it later without tracing the full run.
Common projector setup mistakes
1. Buying the projector before calculating throw ratio for the room
The most expensive mistake. A standard-throw projector in a 16-foot room needs 10+ feet of throw distance, which puts it in the golfer’s swing zone and casts shadows on every shot. Calculate Required Distance = Screen Width x Throw Ratio before you buy anything.
2. Mounting into drywall instead of structural joists
A projector hanging from drywall anchors will vibrate with every ball impact on the screen, shifting alignment over time and eventually pulling free. Use a stud finder, hit the joist, and use lag bolts. This takes 5 extra minutes during installation and prevents years of re-calibration.
3. Using a cheap HDMI cable on a long run
A $3 passive HDMI cable from a junk drawer won’t carry a 4K signal reliably past 15 feet. The image flickers, randomly drops to 1080p, or shows color artifacts. Buy an active or fiber optic HDMI cable rated for 4K at your specific run length. The $30-$60 cost prevents the most common troubleshooting issue in simulator builds.
4. Skipping the shadow test before permanent mounting
Temporarily position the projector, turn it on, and take a full swing before drilling holes. If your body casts a visible shadow at any point during the swing, reposition before making it permanent. Moving a projector after mounting means new holes, patching, and starting from scratch.
5. Over-relying on keystone correction
Heavy keystone correction (beyond 15 degrees) visibly degrades image sharpness because it’s digital pixel manipulation. Reposition the projector to minimize keystone, then fine-tune digitally. Use lens shift if your projector has it – it adjusts optically rather than digitally and preserves full image quality.
Frequently asked questions
How far should a projector be from a golf simulator screen?
It depends entirely on the throw ratio. For a 10-foot screen with a 0.8 throw ratio projector, mount it 8 feet from the screen. For a 0.5 ultra-short throw, 5 feet. Calculate: Required Distance = Screen Width x Throw Ratio. Most short throw golf simulator projectors sit 6-9 feet from a 10-foot screen.
Do I need a short throw projector for a golf simulator?
In almost all residential rooms, yes. Standard throw projectors need 10-15 feet of distance behind the golfer, which most rooms don’t have once you account for the hitting zone. Short throw (0.5-0.89) is the standard for golf simulators because it fits in residential ceiling mounts without shadow issues.
How many lumens do I need for a golf simulator projector?
3,000 lumens minimum for a fully dark room (finished basement). 4,000-5,000+ lumens for rooms with ambient light (garages, rooms with windows). Go slightly brighter than you think you need – you can dim the projector, but you can’t add light you don’t have.
Should I get a 1080p or 4K projector for my golf simulator?
For screens under 100 inches diagonal, 1080p looks good and saves money. For screens 100 inches and above (most simulator builds), the difference between 1080p and 4K is visible at normal viewing distance. If budget allows, 4K is worth the upgrade – and it future-proofs the projector for 4K software updates.
Can I use a regular home theater projector for a golf simulator?
Possibly, but check two things first. Throw ratio must work for your room (most home theater projectors are standard throw, which needs too much distance). And lumens must be sufficient – home theater projectors are designed for dark rooms and may wash out in a sim room with any ambient light. Golf-specific models from BenQ and Optoma are optimized for both constraints.
In summary: math first, mounting second
The golf simulator projector setup that looks great on day one and stays calibrated for years starts with 15 minutes of math before any equipment gets ordered. Calculate your throw ratio against your screen width. Verify the mounting distance works in your room. Confirm the projector height aligns with the screen top. Test for shadows before drilling. Run the right HDMI cable the first time.
One detail most setup guides skip: projector lamp life planning. Traditional lamp projectors need bulb replacements every 2,000-4,000 hours at $150-$400 per lamp. At 10-15 hours per week of use, that’s a replacement every 3-6 years. Laser projectors (like the BenQ LK936ST) are rated for 20,000+ hours with no lamp replacement, which effectively eliminates this maintenance cost for the life of the unit. If you’re building a permanent setup, the laser premium pays for itself in avoided lamp swaps.
And remember: the screen surface matters as much as the projector. A wrinkled impact screen produces a wrinkled image regardless of how good the projector is. Ensure even tension on the screen before calibrating the projector. Retension after the first 50-100 ball impacts, because impact screens stretch and settle during the break-in period.
The projector calibration trick I use on every build: after mounting and alignment, project a solid white screen and photograph it with your phone from the hitting position. The phone camera reveals brightness unevenness, color shifts, and alignment errors your eyes compensate for and miss. Fix whatever the photo shows before fine-tuning software settings. Five minutes of phone-camera testing saves hours of “something looks off” troubleshooting later.