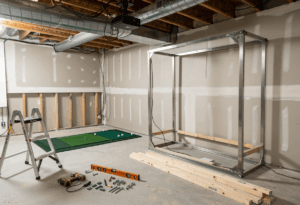
A garage is one of the best places to build a home golf simulator – flexible floor plan, separation from living space, and usually enough depth for a serious build. It’s also the space where small planning mistakes show up fast. Door tracks clip backswings, temperature swings damage electronics, and the car still has to fit somewhere.
I’ve fitted dozens of garage builds in eight years of consulting, and the same handful of issues come up every single time. Ceiling clearance under the door track, not the drywall. Climate control for year-round use. Dual-use planning so the family vehicle still has a home. Get those three right and a garage build is one of the cleanest sim rooms you can put together. Get them wrong and you’ve got expensive equipment gathering dust six months in.
Garage essentials at a glance: Minimum 9 ft ceiling clearance measured to the lowest hanging point (usually the door track, not the drywall). Camera-based launch monitor for tighter spaces. Climate control for year-round use below 50°F. Plan for the car if it’s a shared bay. Budget $4,000-$10,000 for a quality build.
Step 1: Measure the right number, not the obvious one
The single most common garage build mistake: measuring floor to drywall and assuming you have 9 feet. You don’t. The garage door track typically hangs 12-24 inches below the structural ceiling, and that’s the number that matters for your swing arc.
Stand in your intended hitting position and measure straight up to the lowest hanging object – door track, opener housing, light fixture, whatever’s there. That’s your real ceiling. I’ve watched multiple clients discover their « 9-foot garage » is actually 8’4″ at the door track, which kills overhead launch monitor compatibility entirely and forces the driver out of the bag.
Take a slow, full backswing with your driver in the exact spot you plan to hit from. Have someone mark the highest point with painter’s tape. Add 9 inches of clearance. That’s your required ceiling height. If the number comes up short, your options are: relocate the hitting position, raise the door tracks, switch to a side-mount opener, or accept that this is a wedge-and-iron sim.
For width and depth: a typical two-car garage runs 18-22 feet wide and 18-22 feet deep, which is plenty for most builds. Single-car garages at 12 feet wide work but force offset hitting and rule out mixed-handed play. The depth matters most for launch monitor selection – under 16 feet, you need camera-based; under 18 feet, no radar units.
Step 2: Deal with the garage door (the universal problem)
The garage door is the single biggest constraint that doesn’t exist in any other room type. Steel tracks run parallel to the swing plane at ceiling height, and a full driver backswing in the wrong position will clip them violently. Broken clubs, bent tracks, and one very bad day.
You have three real options. The cheapest is to shift your hitting position away from the door track zone. Sometimes moving your stance 18-24 inches forward puts your driver swing under the highest part of the ceiling and clears the issue entirely. Use the painter’s tape test from Step 1 to find the safe spot.
The second option is to raise the garage door tracks. Most garage door companies can reconfigure standard tracks to sit closer to the ceiling, gaining you 6-12 inches of effective clearance. The job typically takes a couple of hours and runs a few hundred dollars. For marginal-ceiling garages, this single upgrade is often what makes a driver-capable build possible.
The third option is a side-mount or wall-mount garage door opener. These eliminate the central opener housing that hangs down 12-16 inches in the middle of the garage. Combined with high-lift door conversion, this can turn an « almost usable » garage into a true premium simulator space. Cost runs $400-$800 installed. For permanent builds with marginal headroom, it’s the cleanest solution available.
The door track shortcut: Before any track modifications, take 10 practice swings in three different positions across your garage. Mark which spot gives you the most overhead clearance. Building around that spot is free. Modifying the door system costs hundreds. Try free first.
Step 3: Pick a launch monitor that fits the garage’s constraints
Garages favor camera-based and ceiling-mounted launch monitors for a specific reason: they don’t need the full 18-20 feet of room depth that radar units require, and they handle the inconsistent lighting that garages typically have.
For budget garage builds: SkyTrak+ ($1,995) is the community consensus pick. Camera-based, works in 15-16 feet of depth, no special background contrast requirements. If you have a single-car garage or a shared two-car bay, this is the right starting point.
For mid-tier garage builds: Bushnell Launch Pro ($2,499) gives you near-Foresight accuracy with full GSPro support. Works in tight spaces, handles garage lighting reasonably well. The Foresight GC3 ($7,500) is the step up if budget allows – same camera technology platform, more data points, slightly better long-term reliability.
For premium garage builds with confirmed 9+ foot clearance: Uneekor EYE XO2 (~$9,000-$10,000) or Trackman iO ($13,995). Both are ceiling-mounted, both eliminate left/right-hand recalibration, both work cleanly in shared bays where you switch between players. The Trackman iO specifically requires 9 ft 4 in minimum room height measured to the underside of the lowest hanging point.
What to avoid in garages: radar units in shallow bays. The Garmin R10, FlightScope Mevo+, and Trackman 4 all need 18-20+ feet of total depth. If your garage is 16 feet deep, the radar unit won’t track properly and no creative mounting fixes that. The MLM2PRO is also a poor garage pick – it doesn’t support GSPro or any major sim platform.
Step 4: Plan for temperature and humidity
This is the hardest-learned lesson in garage simulator builds. Launch monitor accuracy degrades meaningfully below 50°F, projector lamps don’t like temperature cycling, and high humidity is genuinely dangerous to camera-based units. A garage in Minneapolis or Calgary in February is not a viable simulator environment without climate control.
The cheapest path is insulation plus a portable space heater. Insulating the garage door alone gains you 5-10°F in a typical winter, and a 1,500-watt electric heater handles the rest in a moderate climate. Total cost: $300-$800. The trade-off is warm-up time before sessions and ongoing electricity costs.
The standard solution for serious year-round use is a mini-split HVAC unit. A 9,000-12,000 BTU mini-split runs $2,000-$3,500 installed and handles both heating and cooling for most two-car garages. This is what I recommend to any client in a cold climate who plans to use the simulator from October through April. It’s not optional in northern markets – it’s the difference between a 12-month sim and a 6-month one.
Humidity is the underrated risk. Camera-based launch monitors and projectors both suffer from condensation when temperature swings cross the dew point. A simple dehumidifier ($200-$400) keeps the garage in the 30-50% humidity range that electronics actually tolerate. In coastal or southern climates, this matters more than the heater.
Step 5: Decide if the car still parks here
This is the planning conversation most builders avoid until it’s too late. A permanent fixed enclosure is the cleanest install, but it eats one full bay of the garage permanently. If you need to park a vehicle in that bay, you have to build retractable.
The retractable screen route uses something like the SIG G-TRAK system, which mounts to your existing garage door tracks and rolls down when you want to play. Side and top netting extend out at the press of a button. The whole setup deploys and retracts in under a minute. Cost is higher than a fixed enclosure – typically $3,000-$5,000 for the screen system alone – but you keep the parking bay functional.
The simple net-and-mat alternative works for budget builders. A Net Return Pro Series net ($800-$1,200) with a portable mat and a launch monitor on a tripod takes 5 minutes to set up and 5 minutes to break down. You lose the projector and visual sim experience, but you keep all the data. For garages that absolutely must remain dual-use, this is often the right answer.
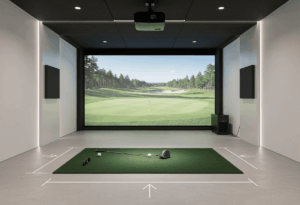
The permanent build works if you have a three-car garage, a detached garage, or a household where the simulator bay is genuinely dedicated. SIG10 or SIG12 enclosures, ceiling-mounted projector, climate control, finished flooring – this is the dream setup, but only if you can commit the space.
The garage builds I see used most consistently are the ones where the family had an honest conversation about parking before any equipment got ordered. The ones that gather dust are the ones where someone « figured we’d work it out » and ended up with a car blocking the bay every weekend. Have the conversation first.
Step 6: Manage the lighting (garages are hard)
Garages are the worst lighting environments for projectors. Daylight bleeding through door gaps, windows without coverings, and harsh overhead bulbs all wash out projector images and confuse camera-based launch monitors. A 3,000-lumen projector that looks great in a basement looks terrible in a garage with an uncovered door gap.
The minimum brightness floor for garages is 3,000 lumens, and that assumes you’ve handled the obvious light leaks. The realistic floor for most garages is 4,000-5,000 lumens. The BenQ TH671ST at 3,000 lumens works in a controlled garage, but the BenQ LK936ST at 5,100 lumens works in any garage including ones with persistent ambient light.
Address the easy fixes first. Blackout strip on the bottom garage door gap ($30-$60) eliminates the biggest light source. Blackout curtains or panels on any windows ($100-$300) handle the rest. Replace harsh overhead bulbs with dimmable LEDs or shut them off entirely during sessions. These small fixes often outperform spending an extra $2,000 on a brighter projector.
Camera-based launch monitors specifically need consistent lighting in the hitting zone. Direct sunlight crossing the ball position causes detection errors. If your garage has an east or west window that hits the hitting area at certain times of day, that window needs full blackout treatment – not partial.
Step 7: Floor, mat, and mounting
Garage floors are typically concrete, which is fine structurally but creates two problems: cold transmission and impact noise. A bare concrete floor turns the entire garage into a sound chamber, and golf balls hitting an impact screen at 150 mph become audible throughout the house.
The cheap fix is interlocking foam tiles or rubber mats ($200-$500) under the hitting area and surrounding it. This dampens noise, insulates from cold, and creates a finished look at minimal cost. The premium fix is laying full nylon turf across the entire garage floor ($800-$2,000), which looks phenomenal but takes a weekend to install properly.
Your hitting mat needs the same care as any other simulator build. Don’t skimp here. The Country Club Elite ($200-$350) is the budget standard. The Fiberbuilt Studio ($949) is what I recommend for any serious user hitting more than 50 balls a week. Cheap foam mats transmit shock straight to your wrists and elbows – a chronic injury from a $150 mat costs you more than the savings.
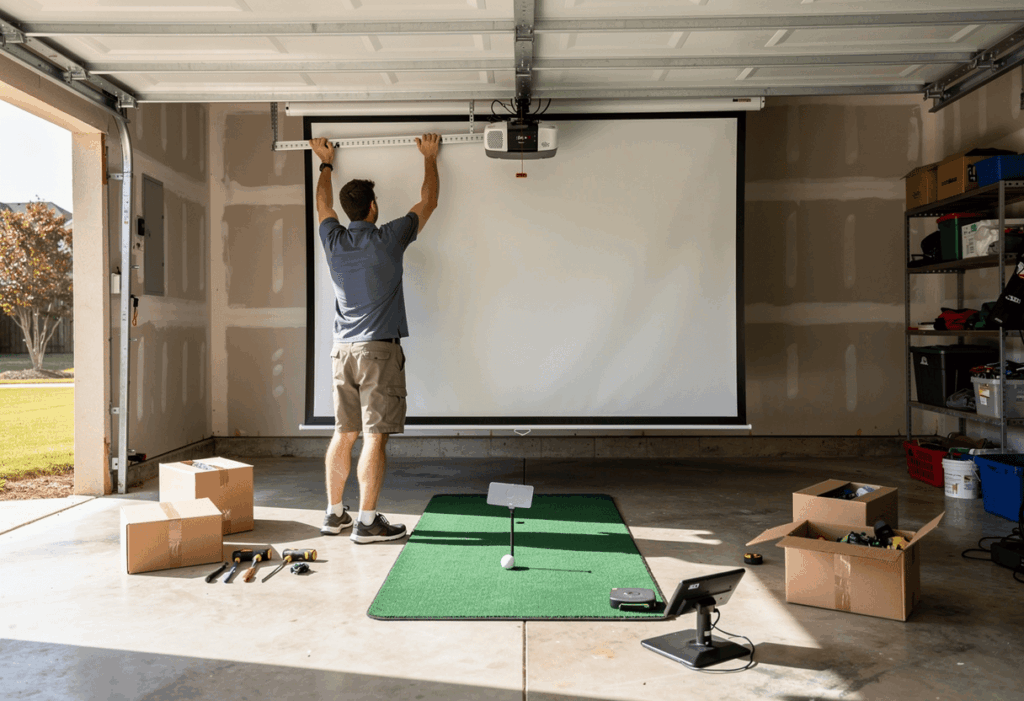
Ceiling mounting in a garage requires extra care. Garage ceilings are typically just drywall over open joists, which means projector and launch monitor mounts need to hit actual structural members. Use a stud finder to locate joists before drilling, and use lag bolts rather than drywall anchors for any mount carrying more than a few pounds.
Common garage-specific mistakes
1. Not measuring under the door track
The most expensive garage sim mistake. Builders measure ceiling-to-floor at 9’4″, buy a Trackman iO that requires 9’4″ minimum, then discover the door track sits at 8’8″ right above their hitting position. Always measure to the lowest hanging point in the actual hitting zone, not the highest point of the ceiling.
2. Skipping climate control in cold climates
A garage simulator in Minneapolis without heat is a 6-month sim, not a 12-month one. Plan climate control as part of the build budget, not as something to add later. A $2,500 mini-split installed with the build is dramatically cheaper than retrofitting one after you’ve already spent $8,000 on equipment that’s now sitting in a 30°F room.
3. Buying a radar launch monitor for a 16-foot garage
The Garmin R10, FlightScope Mevo+, and Trackman 4 all need 18-20+ feet of total depth to function. If your garage is shallower than 18 feet, radar units are off the table. Buy camera-based or ceiling-mounted instead, and accept the limitation.
4. Forgetting to blackout the door gap
The 1-inch gap at the bottom of every garage door is the single biggest light leak in the room. Fix it with a $30 blackout strip and your projector image immediately looks 30% better. Builders who skip this step waste money on brighter projectors trying to compensate.
5. Building dual-use without a real plan
« We’ll figure out where the car goes » is not a plan. Either commit the bay permanently, build retractable, or use a portable net setup. Hybrid setups where the car blocks the screen half the time get used a fraction as much as committed builds.
Frequently asked questions
Can I build a golf simulator in a single-car garage?
Yes, with constraints. A typical single-car garage is 10-12 feet wide and 18-22 feet deep, which forces an offset hitting position and rules out mixed-handed play. SkyTrak+ or Bushnell Launch Pro are the right launch monitors for tight spaces. Expect to build retractable or accept that the car parks elsewhere when you’re playing.
What’s the minimum ceiling height for a garage golf simulator?
9 feet measured to the lowest hanging point in your hitting zone, including garage door tracks. Most garages have 9-foot drywall ceilings but 8-foot effective clearance after door tracks and openers eat the difference. Below 9 feet, you’re restricted to irons and wedges or you need to modify the door system.
Do I need to insulate my garage for a golf simulator?
It depends on climate. In moderate zones (50-80°F year-round), insulation is optional. In cold climates, insulation plus a heat source is essentially required for year-round use – launch monitor accuracy degrades below 50°F and projector electronics suffer from temperature cycling. Plan for $500-$3,500 in climate control as part of the build budget.
How much does a garage golf simulator cost?
Budget builds run $2,000-$4,000 with a Garmin R10 or SkyTrak+ and a basic net setup. Mid-tier builds with full enclosure, projector, and gaming PC land at $5,000-$10,000. Premium builds with overhead launch monitors and 4K laser projection run $15,000-$25,000. Add $1,500-$3,500 for climate control in cold climates.
Can I park my car in the garage with a golf simulator?
Yes, if you build for it. Retractable screen systems like the SIG G-TRAK roll up and out of the way in under a minute. Portable net setups break down in 5 minutes. Permanent fixed enclosures eat the bay full-time and require parking elsewhere. Decide which model fits your household before buying anything.
What launch monitor works best in a garage?
For most garages, camera-based units are the right answer: SkyTrak+, Bushnell Launch Pro, or Foresight GC3. They work in tighter spaces than radar units and handle garage lighting reasonably well. For premium permanent builds with confirmed 9+ ft clearance, the Uneekor EYE XO2 or Trackman iO are the top overhead picks.
In summary: garages reward planning more than spending
The best garage golf simulator isn’t the most expensive one. It’s the one where you measured to the door track instead of the drywall, planned the climate control before winter hit, and had the parking conversation with your household before ordering any equipment. I’ve seen $6,000 garage builds that get used five times a week and $25,000 builds that get used twice a month. The difference is preparation, not budget.
One angle most garage guides skip: the sound impact on the rest of the house. A golf ball hitting an impact screen at 150 mph in an attached garage creates a noticeable thump throughout the adjacent rooms. Acoustic panels on the screen-side wall ($150-$400) and a foam underlayment beneath the hitting area dramatically reduce the noise transfer. Households where this gets addressed end up with simulators that get used at 10pm without family complaints. Households that skip it end up restricted to « acceptable hours » by the rest of the family.
And do the painter’s-tape test before you spend a single dollar. 30 minutes of measurement saves thousands in returned equipment and abandoned builds. The most successful garage simulators I’ve fitted started with a tape measure and a slow driver swing. The unsuccessful ones started with a shopping cart.
The garage build I’m proudest of from last year was a $5,800 setup in a single-car bay with 8’10 » effective clearance. The owner went with a 44-inch driver instead of his standard 45.5, picked a Bushnell Launch Pro, ran a Carl’s Place enclosure offset to one side, and installed a $900 mini-split. Two years later it’s still his favorite room in the house, and he plays it four nights a week. Constraints don’t kill garage builds. Ignoring them does.